Migrating from ProScan 1.3 |

|

|
|
Migrating from ProScan 1.3 |
|
|
Migrating from ProScan 1.3 |
|
|
|
Migrating from ProScan 1.3 |
|
|
|
|
||
BEFORE YOU ATTEMPT TO MIGRATE - do two things:
1) Backup your application (more than once for safe keeping)
2) READ this guide
This migration guide is divided into five sections:
Section 1 - Migration Notes
Section 2 - Instructions if you are planning on compiling your application to run in ProScan 1.3 compatibility mode
Section 3 - Migration if you do not mind re-importing the ProScan procedures into your application
Section 4 - Migration if you have made extensive modifications to your application and do not want to re-import the TXAs
Section 5 - Manually adding a ProImage button to the Scan Manager
Migration Notes
If you are upgrading an existing application from ProScan 1.3 there are a few things you need to consider:
1) If you have not made any changes to the appearance or underlying code in the ProScan procedures, then your upgrade will be easy and you can follow the steps below.
2) If you have only made cosmetic changes - you should look at the new Demo applications and consider if it is just faster and easier for you follow the steps below - then just redo those changes. Note that after you get your app converted (in regards to the embeds below) then future updates to the .clw file will "flow" into your procedures and you should only have minor changes (such as if new controls are added to the window).
3) If you have changed the underlying code (especially in the embed points mentioned below) then you will have to look very carefully at the changes we made to the base code and figure out what you need to do to bring your own code into play. This is a very advanced part of the program and we do not expect many developers to have a problem here. Anyone who made changes at this level will most likely have adequate knowledge on how to look at our code and make their code work with it.
Differences in the code assembly.
In ProScan 1.3 the "working code" was mostly in the ROUTINE embeds and a few DATA and PROCEDURE embeds of the Scan Manager and Scanner Setup procedures. While this made the code easy to follow (most buttons actually just call a ROUTINE), we later determined that it would be tedious and time consuming to update your applications as we continue to enhance ProScan.
As our companion product ProImage was introduced, we moved to a new code delivery paradigm.
This same design is used now in all of our ProSeries tools and ProScan 1.5 has been updated to this code delivery method as well.
Note: There is a "ProScan 1.3 compatibility mode" that can be enabled on the extension templates (see below). This mode will make it possible for you to continue to compile existing ProScan applications with the new templates (without doing a lot of work to update them), but it will NOT bring the much of the new functionality into them. While not a perfect solution, it allows you to stay where you are on the old programs - or migrate at your leisure.
In ProScan 1.5 most of the "working code" is now externalized to the Clarion IDE in a source file called PS_ProScan.ccl (located in the 3rdParty\Libsrc folder). This content is pulled into the ProScan procedures with standard Clarion INCLUDE file technology.
The ProScan templates write all the INCLUDE statements for you and the external source files just "flow" into your application.
This means that when we change the "working code", you should not have to do anything to your ProScan procedures (which you have most likely customized to match the look and feel of your application). At a worst case you may have to occasionally add a button or do some other minor maintenance, but it will be much easier than replacing code in embeds under these procedures.
The only places where the INCLUDE statements are not generated for you is if you are using ProImage as a page editor for ProScan. If you are, then all but four of these are generated by the templates. The four that can not be generated automatically are in the embeds that belong to the ImageEx viewer object for the ProImage editor. Those four are simply one-line INCLUDE statements that are visible when you look at the
embeds under the ImageEx object. No more maintenance is required for them than are for the ones generated automatically and all the working code for ProImage is externalized as well.
Before you start...
WARNING!!!
BACKUP your application!
BACKUP your application!
BACKUP your application!
We are not responsible for lost code or productivity and can not help you if you have problems and you do not have a backup copy of your application.
Instructions if you are planning on compiling your
application to run in ProScan 1.3 compatibility mode
If you are planning on compiling your application in ProScan 1.3 compatibility mode now (and possibly converting it later or not converting it at all) then follow these steps:
Be sure that you have unregistered the ProScan 1.3 templates (both the Legacy and ABC versions) as well as the ProSeries utility templates, then uninstall ProScan 1.3 BEFORE you install ProScan 1.5.
To conform with the standardized naming strategy of the ProSeries tools, the templates have been renamed (at the file level). The new templates carry the old procedure names but you will have problems if you do not do this step!
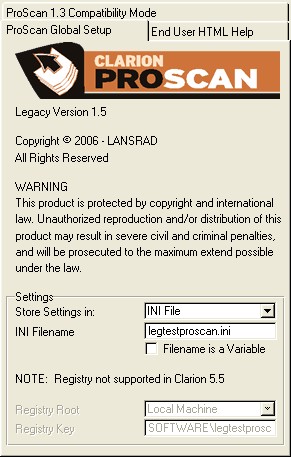
After you have installed ProScan 1.5, the first thing you need to do is go to the Global extension and make sure that your settings for using the INI file or registry are as they should be.
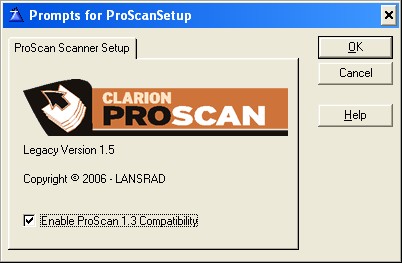
Next you need to enable the ProScan 1.3 compatibility mode for the Scan Manager by checking the option box on the ProScan Control Panel Extension.
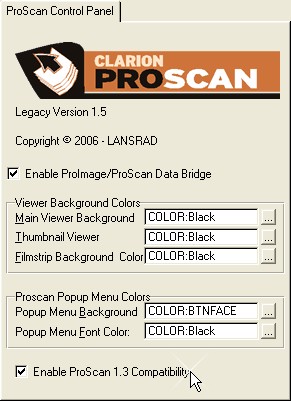
Finally you need to enable the ProScan 1.3 compatibility mode for the Scanner Setup procedure by checking the option box on the ProScan Control Panel Extension.
Note: In the ProScan 1.3 compatibility mode you do NOT delete your old Scanner Setup procedure and you do not rename it.
When the ProScan 1.3 compatibility mode is enabled you can compile your existing programs with no problems. The templates will not generate the INCLUDE file statements, so none of that code will be called.
When (and if) you decide to migrate an existing application over to the ProScan 1.5 code you need only follow the steps in this guide and remember to Uncheck the two option boxes that enable the ProScan 1.3 compatibility mode.
That completes the ProScan 1.3 compatibility mode setup.
Migration if you do not mind re-importing the
ProScan procedures into your application
If you have not changed the look and feel of the ProScan windows, then you can simply use the Application Utility Templates and re-import the ProScan jumpstart TXA into your program
In the IDE, select Application --> Template Utility
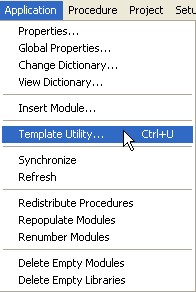
Then select the ABC (or Legacy) version of the ProScan Import:
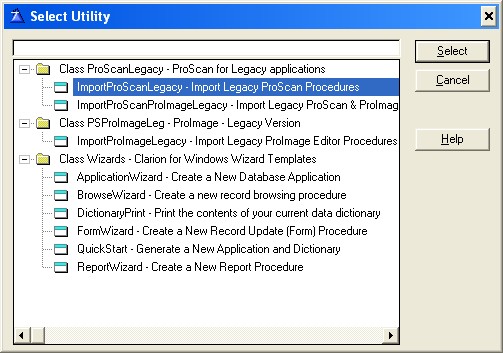
A note for ProImage users: You will notice that there is also a second utility template that will import the jumpstart procedures for both ProScan AND ProImage at the same time. If you are adding ProImage as a page editor for your ProScan enabled application then you should select this entry. It has the ProImage call button template already in place and the data bridge between ProScan and ProImage is already setup. Then after you import the ProImage jumpstart TXAs you should go to the application global extensions and add the ProImage global extensions and check the option box that states that "other ProSeries tools are used in this application".
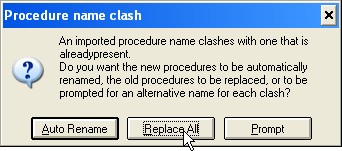
After you select the template to import, when prompted - click the REPLACE ALL option.
The new ProScan jumpstart procedures will be imported into your application and will replace the existing ones.
Note: In order to allow the external ProScan code library for the Scanner Setup to work with both the ABC and the Legacy versions of ProScan, the name of the Scanner Setup procedure has been changed.
The old procedure names were:
WnABCScannerSetup
WnLegScannerSetup
The new procedure name is WnScannerSetup
Note: If you are planning on compiling your program in ProScan 1.3 compatibility mode - do NOT delete the old procedure (follow the steps in Section 2 instead).
If you are migrating to Proscan 1.5, you have just imported the new WnScannerSetup procedure into your application, you can delete the old one (ABC or Legacy - as shown above).
That completes the migration process.
Migration if you have made extensive modifications to
your application and do not want to re-import the TXAs
If you have made a lot of modifications and decide not to re-import the jumpstart procedures, you will need to make these changes:
Rename the Scanner Setup Procedure
●Select the Scanner Setup procedure in the IDE procedure tree.
●Press F2 to edit the procedure name
●Change the name to be: WnScannerSetup
Delete some of the old code embeds in both
the Scan Manager and the Scanner Setup procedures
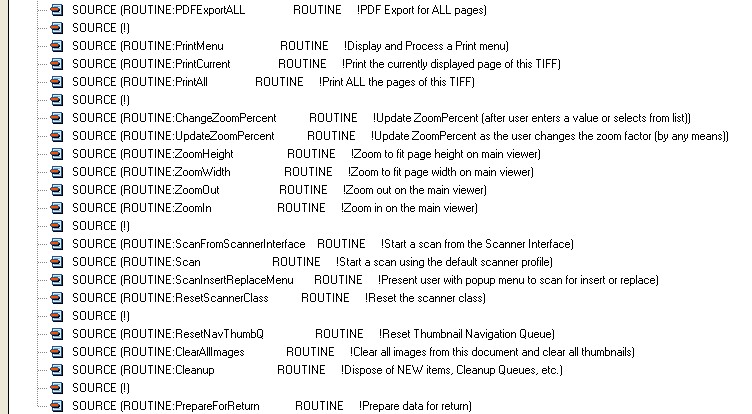
Note: If you have modified the code embeds in the Scan Manager or the Scanner Setup, then it will be up to you to figure out what changes you have made and how they compare to the new code in ProScan 1.5. The old ROUTINE names are the same - but they are now in the PS_ProScan.ccl source file. Be aware that to maintain backwards compatibility with old code, there are what appear to be duplicates of some ROUTINE names in the file - but they are in fact two different sets, one belongs to the Scan Manager - the other to the Scanner Setup.
Since the "working code" for ProScan is now contained in the SECTIONS of the external PS_ProScan.ccl source file, we need to delete the code in the ones under the procedure tree.
Note: if you have added DATA to the local embeds, you can leave your data in place, but you need to remove the ones that came with the ProScan jump starts or you will get duplicate errors.
Under Local Data, delete these three embeds:

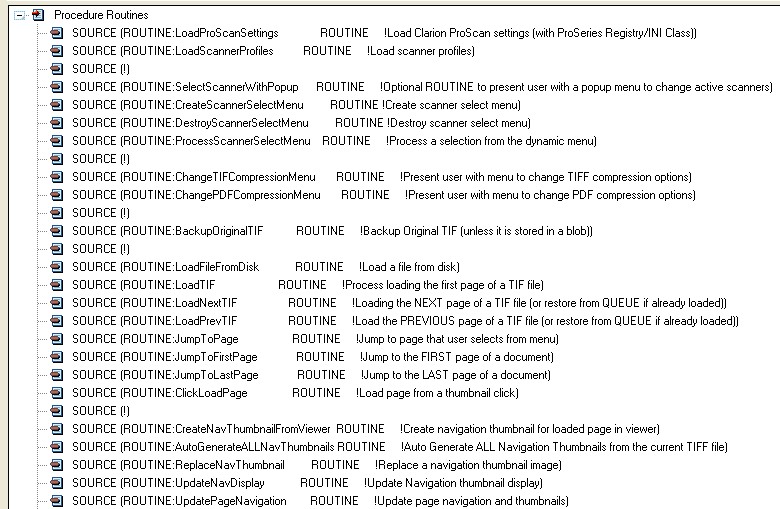
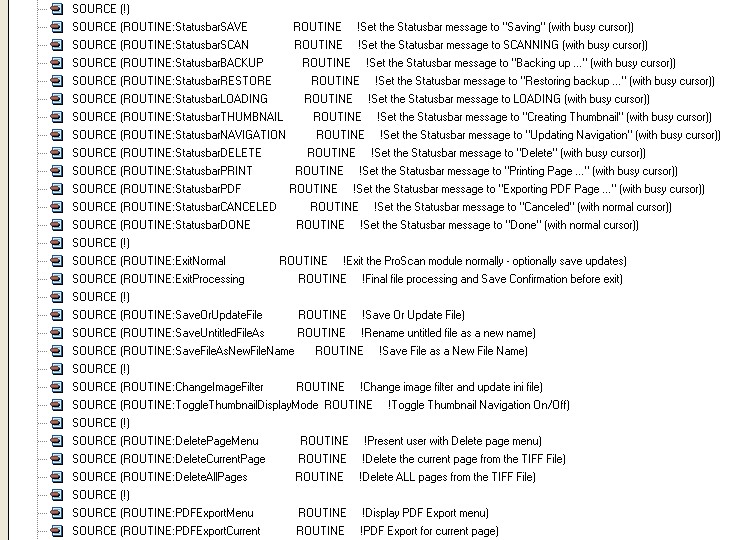
Under the Procedure Routines, delete all of the ProScan routines below
(be careful not to delete any you have added for your own code!)
Finally delete the local procedures

Do NOT delete any of the code under buttons or in other templates!
Repeat these deletions for both the Scanner Setup and the Scan Manager
If you are not adding ProImage to the migrated application, then that completes the migration process.
Manually adding a ProImage button to the Scan Manager
If you are migrating an existing application to ProScan 1.5 and are planning on using ProImage as the page editor, you will need to manually add the ProImage call button template to the Scan Manager toolbar.
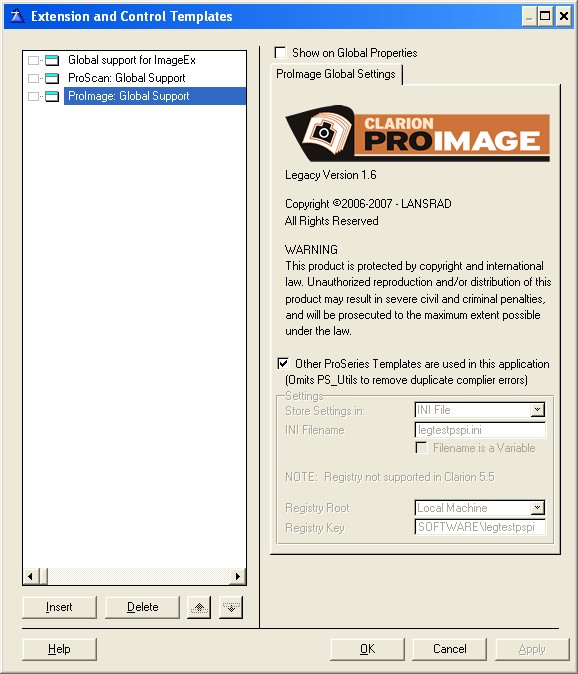
First add the Global ProImage template extension:
Using Multiple ProSeries tools in the same program
ProScan, ProImage and other future ProSeries tools share a common library code to make it easy to maintain tools for parsing filenames and other common functions. When you add ProImage to a program that already has another tool in it, just check the box that says Other ProSeries Templates are used in this application. This will make sure that the prototypes for these classes are only included one time and will remove duplicate symbol compiler errors.
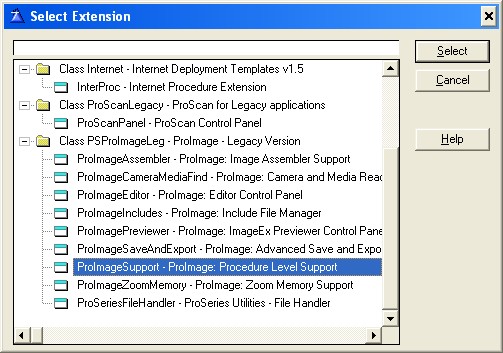
Add the ProImage Procedure Level Support template
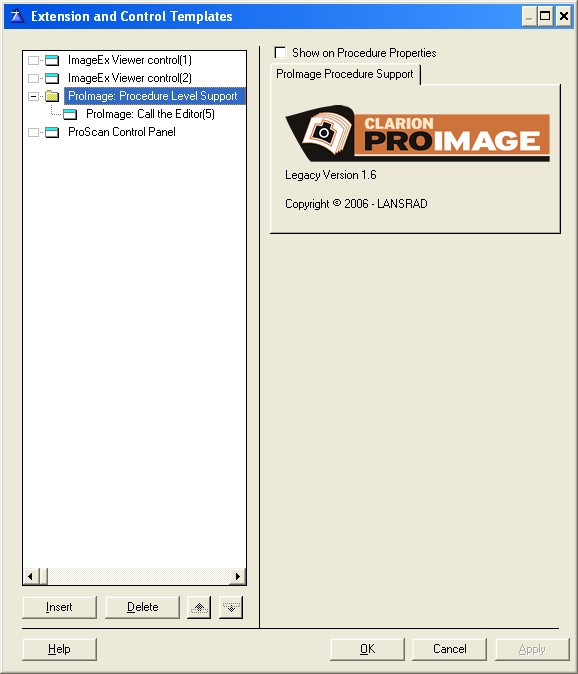
Before you can add the ProImage button to the Scan Manager toolbar you need to add the ProImage procedure level support template to the Scan Manager. Open the Scan Manager procedure extensions and insert to add this template:
When the template has been added you will see this template:
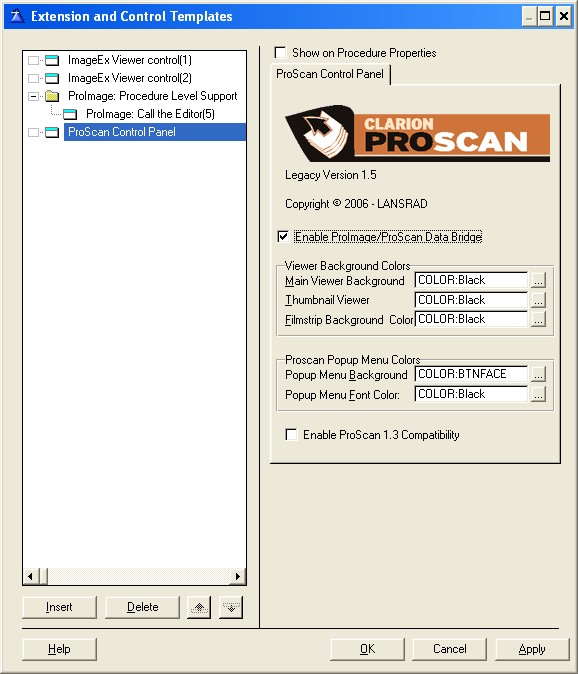
Enable the ProScan/ProImage Data Bridge on the ProScan Control Panel template
Click the ProScan Control Panel template to select it, then check the box marked "Enable ProImage/ProScan Data Bridge"
Add the ProImage Call Button to the Scan Manager toolbar
Open the Window formatter for the Scan Manager.
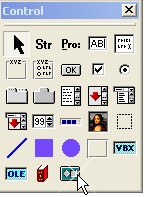
Click the Control Template icon to add the ProImage Call Button template:
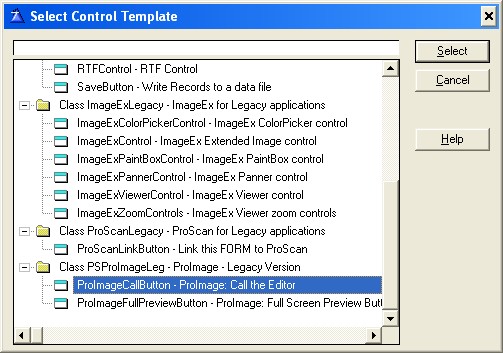
Scroll down and select the ProImage Call Button template:
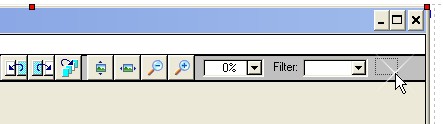
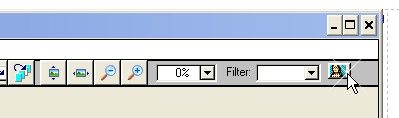
When the cursor is ready for you to put the control on the window - do NOT just click on the toolbar. If you do then Clarion will enlarge the toolbar and make a mess of things.
Instead click in the area shown below and draw out a tiny version of the template as a square.
Don't worry about getting it just so - we will adjust it in the properties box!
Just make it look like this (be sure to stay smaller than the other icons)
When you are done it will look something like this:
After the control is added, right click on it and go to the position tab.
Then enter these values:
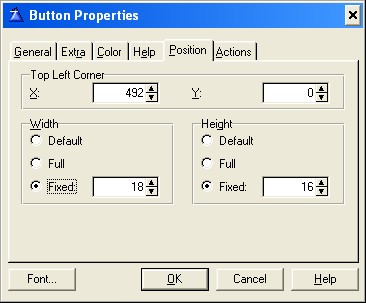
When you are finished it will look like this:

Enable the ProImage Data Bridge and set ProImage up to work with ProScan
Click the Action tab to get to the ProImage button.
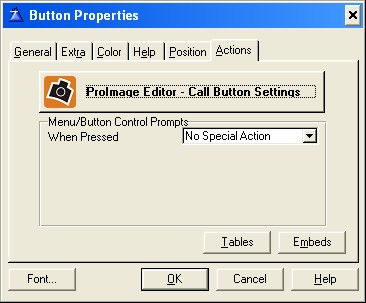
Click the button to open the ProImage call button template
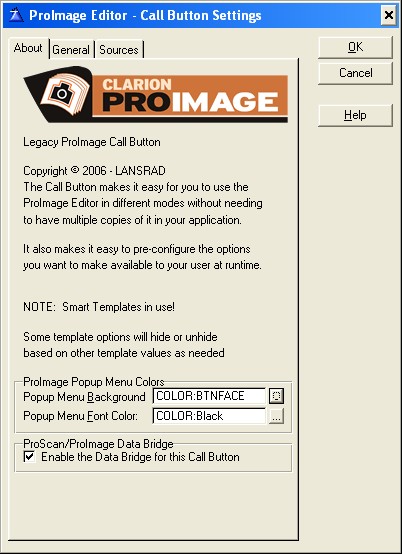
Check the box that says "Enable the Data Bridge for this Call Button"
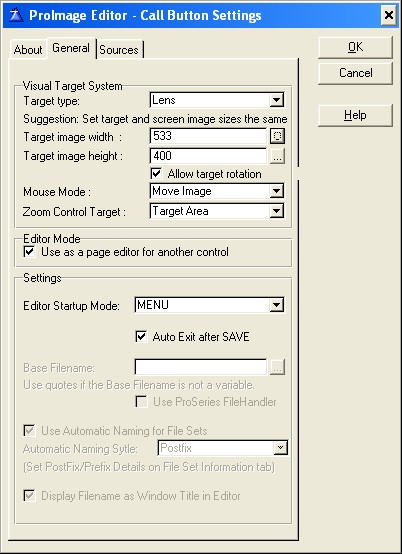
Click the General tab to setup ProImage to work with ProScan.
Refer to the ProImage help for details on configuring ProImage, but these are the general settings to use when ProImage is being a page editor for ProScan.
Note: The target size you set here is what will be used as the MAXIMUM size of images that originate in ProImage.
However when you send a image from ProScan into ProImage for editing - then the actual size of that image will be used for the target size.
This prevents ProImage from re sizing an image (such as downsizing a full page scan to a photo size) when it is loaded for editing.
Click the Sources tab to finish the configuration:
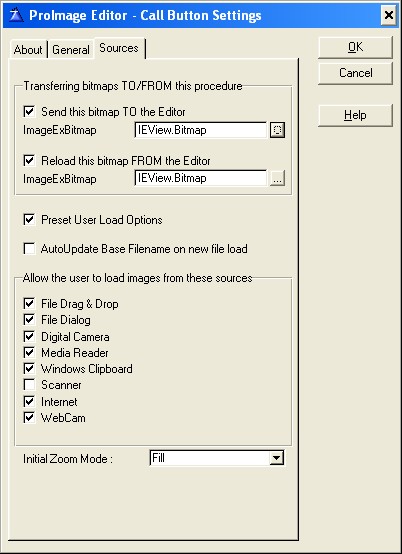
You need to specify the name of the viewer bitmap in ProScan as the FROM and TO sources.
Note: if you use the ProScan/ProImage TXA to jumpstart your application then all this is preset for you.
Hint: Disable the Scanner Source in ProImage when using it with ProScan
Initial Zoom Mode
If you set the initial zoom mode to fill - the entire page will be displayed when it is loaded into ProImage.
How ProImage interacts with ProScan.
With the data bridge enabled and a ProImage call button added to the ProScan toolbar, you will be able to send the current page from ProScan into ProImage for editing. You will also be able to insert photos processed by ProImage into the ProScan TIFF file.
When you click the ProImage call button in ProScan (with the data bridge enabled) you will be presented with a menu. From this menu you can select to Edit the current page, or insert a new image before or after the current page - or as the first or last page of the ProScan TIFF.
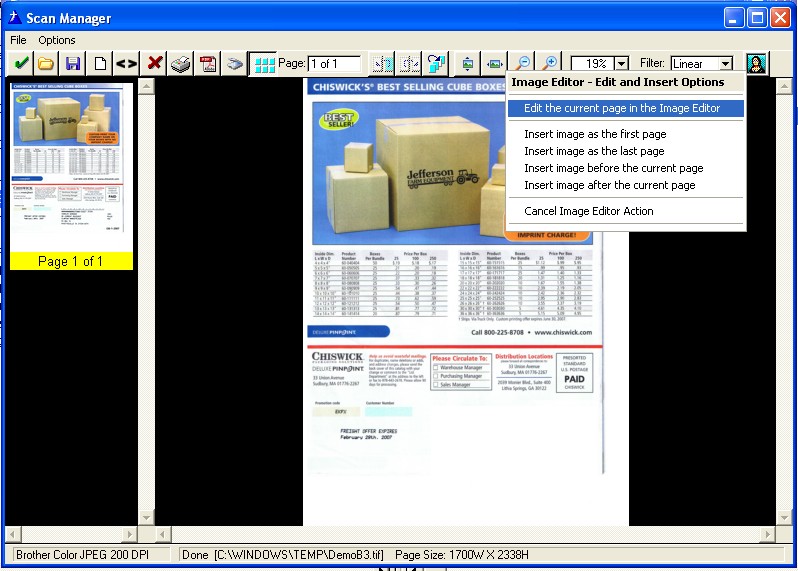
See the help sections for details on editing pages or inserting new ones.
This concludes the process of manually adding a ProImage button to the Scan Manager